

We hike Bukhansan every time we return to Seoul. At this point, we have done it more times than we can easily count. We still keep going back.
Partly because Bukhansan is spectacular, but also because hiking here never feels like simply escaping Seoul for a few hours. The mountain is woven into the city. You can leave the subway, walk through an ordinary residential street and, surprisingly quickly, find yourself scrambling over granite with Seoul spread out below you.
Then you come back down and eat.
For us, a Bukhansan day usually ends with jeon and makgeolli, sometimes accompanied by local hikers explaining what we should order, how we should drink it or simply wondering why we keep coming back. And we do keep coming back.
Our favourite way to hike Bukhansan is not the shortest route to the highest summit. We usually do a long ridge traverse, entering from the western side around Bulgwang, crossing the rocky ridges and fortress sections towards Baegundae, and descending towards Ui-dong.
It is long, physically demanding and absolutely not the route everybody should choose. But that is one of the most important things to understand about Bukhansan:
There is no single “Bukhansan hike.”
Baegundae is the mountain’s highest and most famous summit, but Bukhansan contains multiple ridges, peaks, fortress trails and easier Dulle-gil walking routes. Bukhansan National Park itself covers both Bukhansan and Dobongsan and spreads across more than 80 square kilometres.
The right trail depends on how much time you have, how comfortable you are on steep rock and what kind of mountain day you want. In this guide, we cover the main Bukhansan hiking routes, how difficult they are, how long they take, where to start, how to get there from Seoul, what to wear, when to hike and what to expect on the mountain — including the ridge traverse we keep coming back to.
Which Bukhansan trail should you choose?
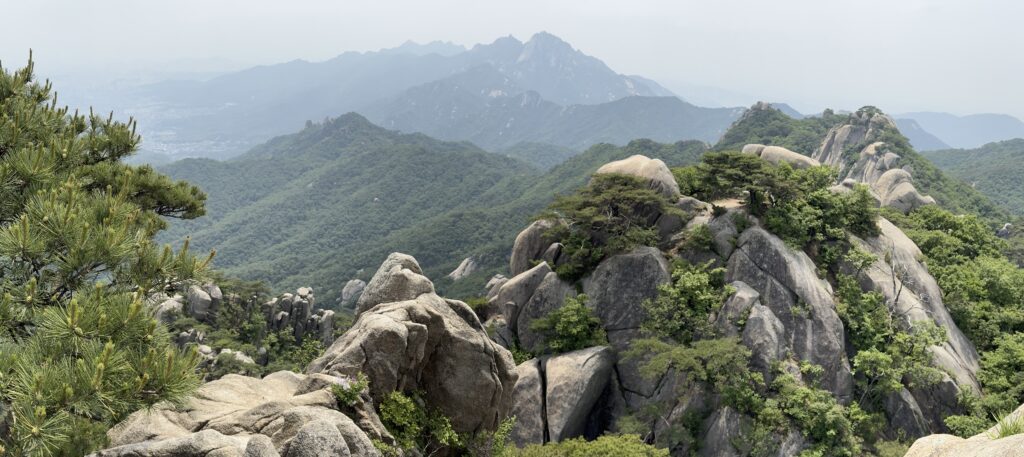
There is no single best Bukhansan hike: the right route depends on your experience, available time and how much steep or rocky terrain you want. Times vary considerably with the exact trailhead, route, weather, crowds and hiking speed, so treat them as planning ranges rather than deadlines.
| Route | Best for | Difficulty | Time | Main reason to choose it |
|---|---|---|---|---|
| Ridge traverse | Experienced hikers | Very hard | Full day | The most complete mountain experience |
| Baegundae from Ui-dong | Reaching the highest summit | Hard | 3–5 hours | Most direct Baegundae route |
| Baegundae from Bukhansanseong | First substantial hike | Hard | Around 5 hours | Summit + fortress scenery |
| Uisang Ridge | Scrambling and dramatic ridges | Very hard | 4–6+ hours | Serious rocky terrain |
| Bibong Ridge | Scenic ridge hiking | Moderate–hard | Varies | Great views without full traverse |
| Bukhansan Dulle-gil | Easier walking | Easy | Flexible | Forest and foothills without summit terrain |
- Choose Baegundae from Ui-dong if reaching Bukhansan’s highest summit is your priority and you want the most direct route.
- Choose Baegundae from Bukhansanseong if this is your first hike here and you want the summit with a longer, more varied approach.
- Choose the ridge traverse if you are a strong, experienced hiker and want a full mountain day rather than simply reaching Baegundae.
- Choose Uisang Ridge if scrambling, steep granite and ridge terrain are exactly why you hike.
- Choose Bibong Ridge if you want ridge scenery but do not need to link the entire mountain.
- Choose a Dulle-gil section if you want to experience the Bukhansan landscape without steep summit terrain.
There is no prize for choosing the hardest route. There is also no reason to reduce Bukhansan to the easiest one if you are capable of more.
Our favourite Bukhansan hike: the ridge traverse
Bukhansan Ridge Traverse is the route we come back for. The basic idea is to cross Bukhansan rather than climb one summit and return the same way:
Bulgwang / western entrance → Bibong Ridge → central ridges → Munsubong → Bukhansanseong fortress sections → Baegundae → Ui-dong
The traverse is roughly 14 km with around 1,350 metres of elevation gain, taking approximately 5–7 hours for strong hikers, with granite ridges, steep rock, scrambling, fortress sections and exposed terrain.
Those numbers explain only part of the difficulty.
The real challenge is the accumulation. You climb. You descend. You climb again. You scramble.You think you have completed the difficult part. You discover another ridge.
There are very few long sections where you simply settle into an easy walking rhythm. And that is exactly why we love it.
Start around Bulgwang
The beginning of this hike feels comically urban. You leave Bulgwang Station, walk through residential streets and gradually find the entrance to the mountain.
If it feels as though you are walking through a normal Seoul neighbourhood rather than approaching a national park, that is completely normal.
That transition is one of the things we love most about hiking in Seoul. The city does not stop and the wilderness begin at some dramatic gateway. One gradually becomes the other.
Pass Bibong Ridge
Once you reach the ridge, Bukhansan stops behaving like a conventional forest hike. Granite becomes increasingly important. There are short scrambles, narrow rocky sections and repeated views across Seoul and towards the surrounding peaks.
This is where you should already know whether you have chosen the right hike. If steep rock and using your hands occasionally makes you uncomfortable, a full ridge traverse is not going to improve later.
The central Bukhansan ridge
This is the section that makes the route feel much longer than its distance suggests. You repeatedly lose elevation you have just worked to gain. Then you climb again.
The landscape keeps changing between forest, granite, fortress structures and open ridges.
The mountain has more than twenty large and small peaks, making a ridge traverse fundamentally different from a standard summit hike. This is Bukhansan at its most interesting to us.
Not one viewpoint. A sequence of them.
Munsubong
Munsubong, at roughly 727 metres, is one of the key points where several of Bukhansan’s major ridges become visually understandable. From around here you can see how Bibong Ridge, Uisang Ridge and the fortress/main ridge fit together.
It is also an excellent place to remember that you are not finished.
Bukhansanseong Fortress
One of the reasons this hike is much more interesting than a pure mountain traverse is that history keeps interrupting the geology. Sections follow or cross the remains of Bukhansanseong Fortress, built in 1711 to defend the Joseon capital.
The fortress extends for approximately 11.6 km through the mountain terrain, with major gates and hidden gates incorporated into today’s trail network. You can be completely absorbed in scrambling over rock and suddenly find yourself beside a stone wall or passing through a gate.
It gives the hike another dimension.
The final approach to Baegundae
In the end, you reach the part of Bukhansan that most first-time visitors recognise. Baegundae is the highest point of Bukhansan at around 836 metres, and the final approach is steep and rocky.
Wire ropes and fixed supports assist hikers on the steepest sections. The interesting thing when you arrive via a long ridge traverse is the sudden appearance of people.
You may have spent hours on relatively quiet ridges. Then Baegundae feels busy.
On weekends and during peak autumn foliage, queues can develop around the narrow final summit section. After a long traverse, waiting in line for the summit photo can feel slightly surreal but it is rewarding.
Descending towards Ui-dong
From Baegundae, we descend towards Ui-dong. The route is straightforward compared with the ridge, but the descent can feel long once your legs are tired.
It is particularly hard on the knees after hours of repeated climbing and descending. Eventually, the mountain gives way to roads, restaurants and public transport.
And then comes what may be our favourite section of the entire day. Food.
What makes the Bukhansan Ridge Traverse difficult?
The traverse is difficult because of cumulative elevation, repeated climbs and descents, rocky terrain, scrambling and length, not because any one section is impossibly technical.
A comparable western-to-eastern traverse is around 14 km with approximately 1,350 metres of climbing. For hikers accustomed to mountain terrain, that is demanding but manageable.
For someone whose definition of hiking is a three-hour forest walk, it is a very different proposition. You should be comfortable with:
- long mountain days;
- steep ascents and descents;
- uneven granite;
- using your hands on rock;
- exposed-looking terrain;
- tired legs on technical footing;
- continuing for several hours once you are already fatigued.
If those things sound exciting, the traverse may be exactly what you want. If they sound alarming, choose another Bukhansan route.
Is Bukhansan difficult?
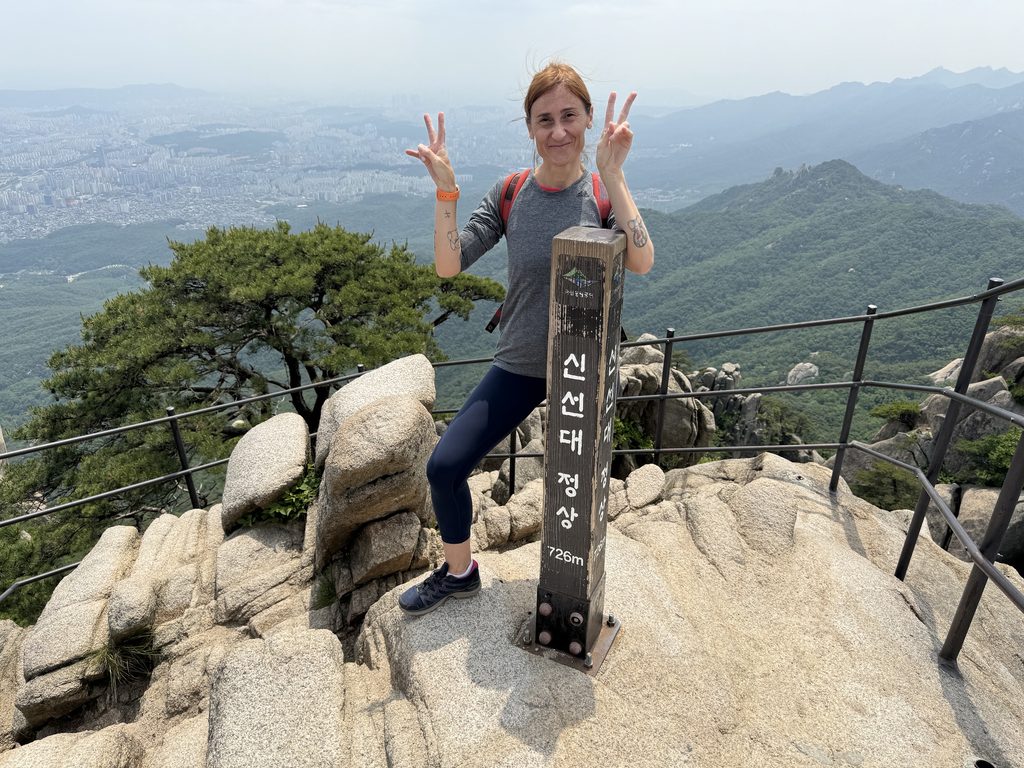
Bukhansan can be easy, moderate or genuinely hard depending on the route. This is why descriptions such as “Bukhansan is a difficult hike” are not very useful.
The Dulle-gil includes easy walking sections. Shorter routes to gates and lower viewpoints can be moderate.
Baegundae involves steep granite and fixed ropes near the summit. Uisang Ridge and full traverses are serious mountain days.
Choose the trail first. Then decide whether Bukhansan is difficult for you.
Best Bukhansan route for first-time hikers: Baegundae
If you want to hike Bukhansan once and reach its highest point, Baegundae is the obvious choice.
There are several ways to reach it.
1. Baegundae from Ui-dong
This is the most direct summit approach. The route from the Baegundae Information Center in Ui-dong is the fastest way to reach the summit, with the direct ascent taking around 1.5 hours for fast hikers before accounting for descent and stops.
The final section becomes much steeper than the early trail and includes rocky terrain and fixed wire ropes. Do not confuse “shortest” with “easy.”
2. Baegundae via the longer Ui route
A broader official circuit via Yeongbong and Baegundae covers approximately 9.98 km, with an average hiking time of 4 hours 20 minutes, and is classified as advanced.
This gives you more of the mountain than simply racing to the summit.
3. Baegundae from Bukhansanseong
Another classic approach starts from Bukhansanseong Information Center on the western side: a 9 km circuit taking approximately five hours:
Bukhansanseong Information Center → Deungungak → Baegundae → Yongammun → Jungheungsa → Bukhansanseong Information Center.
This is the route we would consider if somebody wanted a substantial first Bukhansan hike but was not ready for a full ridge traverse.
Uisang Ridge: for experienced hikers
Uisang Ridge is one of Bukhansan’s serious routes that may be too difficult for novice hikers.
The ridge links peaks including:
Uisangbong → Yongchulbong → Yonghyeolbong → Jeungchwibong → Nahanbong → Munsubong
depending on the exact version you follow. Expect repeated rocky ascents, exposed-feeling sections and significant cumulative effort.
The circuit fom Bukhansanseong Visitor Center across Uisang Ridge to Munsubong and back is about 11 km and it can be covered in around 4.5 hours for an experienced hiker.
Do not use somebody else’s fast hiking time as your schedule. The important information is the terrain.
Bibong Ridge: a good alternative to Baegundae
Bibong Ridge gives you a ridge-focused Bukhansan hike without automatically committing you to the entire traverse.
The landscape combines rocky peaks, scrambling and wide views. It also links naturally towards Munsubong, which is why it forms part of longer cross-mountain routes.
We particularly like this part of Bukhansan because the ridge has much more personality than a simple summit approach.
If you have already climbed Baegundae and want a different experience next time, Bibong is one of the first areas we would look at.
Bukhansanseong–Daenammun: best for hiking and history
For a route where the fortress is more than background scenery, consider the Bukhansanseong–Daenammun trail. Seoul’s official route covers approximately 10.2 km, takes around 4 hours 10 minutes and is classified as advanced. It passes Daeseomun, temples and historical sites before reaching Daenammun and descending towards Gugi. This is an excellent option if you care as much about the historical landscape as reaching a famous summit.
Easier Bukhansan hikes
You do not need to climb Baegundae to justify saying you hiked Bukhansan. There are plenty of easier routes around the national park:
1. Bukhansan Dulle-gil
The Bukhansan Dulle-gil is a network of lower-level walking trails around the mountain. Individual sections vary considerably.
For example, the Banghakdong-gil section is approximately 3.1 km, takes around 1 hour 10 minutes and is classified as easy.
The Cloud Garden Trail covers around 5 km and takes roughly two hours, also with easy terrain and views towards peaks including Jokduribong.
These are walks rather than summit hikes, and there is absolutely nothing wrong with that.
2. Uiryeong-gil
Uiryeong-gil is particularly interesting because access was restricted for decades after the 1968 attempt by North Korean commandos to assassinate President Park Chung-hee.
The route reopened in 2009 and now operates under a reservation system. It covers approximately 6.4 km, takes around two hours and is considered easy. Reservations are required and identification is checked at the trailhead.
This is a completely different Bukhansan experience from Baegundae.
How to get to Bukhansan from Seoul
Bukhansan does not have one trailhead. Your transport depends entirely on your route.
1. For Baegundae from Ui-dong
Take the Ui-Sinseol Line to Bukhansan Ui Station.
This is the easiest public-transport approach for the eastern side of the mountain and the most direct Baegundae routes.
2. For the western Bukhansanseong entrance
Take Line 3 to Gupabal Station, then continue by bus towards Bukhansanseong Entrance.
Official Seoul guidance currently lists bus 704 from Gupabal for several western-side routes.
3. For the ridge traverse
We start around Bulgwang Station, served by Lines 3 and 6, and approach the western ridge entrances from there. The important advantage of a traverse is that you do not return to your starting point.
The disadvantage is that you need to understand both your entrance and your exit before you begin. We finish towards Ui-dong, where public transport back into central Seoul is straightforward..
What to wear to hike Bukhansan
You will see Korean hikers wearing enough technical equipment to make you question every clothing choice you made that morning.
You do not need to copy all of it. You do need good grip, comfortable clothing and enough protection for the conditions.
For most non-winter hikes, we prioritise:
- shoes with genuinely good grip;
- comfortable hiking clothes;
- a light layer for wind at elevation;
- sun protection;
- enough water;
- food or snacks;
- a small backpack;
- gloves if you are doing a scrambling-heavy route and prefer hand protection.
For the ridge traverse, grip matters more to us than whether your footwear technically qualifies as a hiking boot.
Do not wear fashion trainers on Bukhansan, regardless of experience. Dry granite can already be steep; wet or dusty rock makes poor grip an unnecessary problem.
best time to hike Bukhansan
For most hikers, spring and autumn are the best times to hike Bukhansan.
Spring usually gives you comfortable temperatures and fresh greenery, while autumn combines cooler weather with some of the mountain’s best foliage. Both are particularly good for longer or steeper routes because you avoid the worst of Seoul’s summer heat.
Summer is still possible, but heat and humidity can make a demanding ridge route considerably harder. Winter can be beautiful, but snow and ice turn steep granite into much more serious terrain and may require winter equipment such as microspikes.
The best time ultimately depends on the route you want to hike. A Dulle-gil walk is far more forgiving than a full ridge traverse or a steep Baegundae approach.
Hiking Bukhansan in spring
Spring is one of the best times to hike Bukhansan. Temperatures are usually much more comfortable than in summer, the mountain starts turning green again and the air can feel much clearer than during the hottest months. Early spring can still be cold, especially at elevation and in shaded sections, while later spring is generally much milder.
It is also a good season if you want to combine hiking with Seoul’s spring scenery without dealing with peak autumn crowds.
The main thing to remember is that spring conditions can change quickly.
You may start in warm sunshine and still encounter cold wind higher up, so bring a light layer even if central Seoul feels comfortable.
After rain, granite sections can also become slippery.
For longer routes such as the ridge traverse, we particularly like spring because you can cover serious distance without the heat and humidity making every climb harder than it needs to be.
Hiking Bukhansan in summer
Summer can be hot, humid and exhausting. The issue is not merely discomfort. Heat changes how demanding a long ridge route becomes.
Start early, carry more water than you think you need and be willing to choose a shorter route during serious heat. Heat warnings during summer are common, and exposed granite provides substantially less relief than forested trails.
Hiking Bukhansan in autumn
Autumn in Bukhansan is spectacular but it is also popular.
Foliage, cooler temperatures and clearer conditions make this one of the best hiking periods, but famous trails can become extremely busy.
If you are climbing Baegundae on a weekend during peak foliage, do not expect solitude.
Start early. Or choose a route where Baegundae is only one part of the day rather than the entire objective.
Hiking Bukhansan in winter
Bukhansan in winter is beautiful and considerably more serious. Granite that is straightforward when dry can become dangerous when covered in ice.
Microspikes and appropriate winter equipment may be necessary depending on conditions. This is not the moment to discover that your footwear has no grip.
Check current trail and weather conditions before committing to exposed or steep routes.
Hiking culture on Bukhansan
One of the reasons we continue hiking Bukhansan is that the mountain gives you access to something beyond scenery:
Hiking is social in Korea.
People arrive prepared. Groups stop together. Food matters. The post-hike meal matters. And interactions happen.
We’ve had hikers look at us with obvious curiosity, wondering what we were doing on a mountain they clearly considered very much their own. Others have offered us gimbap, and some have simply started talking to us because they wanted to know who we were and why we kept coming back.
There is no guarantee any of that will happen to you. That is not the point.
The point is that Bukhansan is not a natural attraction sitting outside Seoul’s culture. Hiking the mountain is part of Seoul’s culture.
Why Bukhansan is worth hiking
If you enjoy hiking, Bukhansan is absolutely worth it and it is one of the experiences we repeat every time we return to Seoul.
We have hiked Bukhansan more times than we can easily count. At this point, we could use every return to Seoul as an excuse to try a completely different mountain. Sometimes we do. And then we still end up back on Bukhansan.
Part of the reason is the terrain: granite ridges, repeated climbs, fortress walls, steep summit sections and views that make Seoul suddenly look much larger than it does from street level.
But the mountain is also tied to the way we experience the city. That is why we would not describe Bukhansan as a break from sightseeing in Seoul.
If you enjoy hiking, Bukhansan is one of the best ways to experience Seoul itself. For a first visit, choose the route that matches your ability rather than the one that sounds most impressive. Baegundae is the obvious summit goal, the Dulle-gil gives you a much gentler introduction, and the longer ridges are there when you want something more serious.
Our choice remains the ridge traverse. Not because it is the hardest option. Because after doing it again and again, it still gives us the version of Bukhansan we come back for: long ridges, changing views, tired legs, fortress walls, Seoul below and the certainty that somewhere at the end of the trail, there will be food.
We keep hiking Bukhansan because it never feels like we are repeating the same day. It feels like returning to one of the parts of Seoul we understand best.
For a fit hiker comfortable on steep mountain terrain, we would choose Baegundae with a substantial approach rather than simply racing up and down the shortest path. You get the famous summit while seeing enough of Bukhansan to understand why the mountain is more than one peak. For an experienced hiker who enjoys scrambling and wants a serious mountain day, we would choose the ridge traverse.
It can take anything from around an hour for a short Dulle-gil section to most of a day for a ridge traverse. A typical Baegundae hike generally takes several hours, while longer advanced routes can take five, six or more hours depending on pace and conditions.
Established trails are well used, but Bukhansan is still mountain terrain. Steep granite, ice, heat, wet rock, fatigue and choosing a trail beyond your ability can all create genuine risk.
The correct question is not simply whether Bukhansan is safe. It is whether the route and conditions are appropriate for your experience.
If you enjoy hiking, yes. We would choose Bukhansan over several conventional Seoul attractions without hesitation. You are not wasting a day that could have been spent “seeing Seoul.”
Bukhansan is Seoul. The mountain gives you skyline views, historical structures, hiking culture and a completely different understanding of the city’s geography.
If you do not enjoy hiking, however, do not climb a mountain because a travel guide labelled it essential. Spend your day doing something you actually like.
For us the choice is always the same: jeon and makgeolli. Preferably after we have come down hungry enough that ordering several things seems completely reasonable. Jeon (savoury Korean pancakes) and makgeolli, the cloudy fermented rice drink, are deeply associated with hiking culture.
Around major Bukhansan entrances you will find restaurants catering to hikers before and after their walks. We would not schedule an elaborate dinner somewhere on the other side of Seoul immediately after a full ridge traverse.
Come down. Find somewhere busy with hikers. Sit. Eat. Drink. Your legs can deal with the subway later.
Some parts of Bukhansan can be extremely crowded, especially Baegundae. The mountain’s popularity is part of the experience. You are hiking beside people for whom mountains are not an exotic holiday activity but a normal weekend routine.
You will see groups, couples, solo hikers and older people moving uphill at speeds that may damage your self-esteem. We enjoy that. If your definition of a successful hike requires complete solitude, Bukhansan’s most famous routes may not be for you.
But move onto longer ridges and the crowds can thin dramatically.
For a long hiking route in Bukhansan, start early in the morning. For tge ridge traverse, we would not deliberately waste the first half of the day having brunch in Seoul and then begin hiking.
You need margin for:
navigation;
rests;
crowds;
photographs;
slower sections;
weather;
tired legs;
deciding that you need ten minutes to stare at a view.
Yes, beginners can hike Bukhansan but understanding that not every trail is suitable for beginners. Choose a Dulle-gil trail, a shorter gate route or another lower-level hike first.
Baegundae can also be achievable for fit beginners who are comfortable with steep rock, but the final section is considerably more serious than a normal city hike. The ridge traverse and Uisang Ridge are not where we would send somebody for their first mountain experience.
No, not for most established routes if you are an experienced hiker and prepare properly. You do not automatically need a guide for Baegundae.
A guide can be useful for longer ridge routes if you are unfamiliar with Korean trail signage, have limited scrambling experience, are uncomfortable navigating complex junctions or simply want local route knowledge.
Hire a guide because it improves the hike for you, not because hiking Bukhansan independently is inherently impossible.